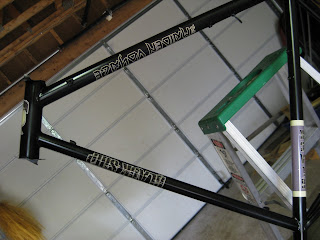
At last, the final coat of paint!
Excitement gathered, and prepped myself for the grand finale of spraying, but - things went horribly wrong. As I applied a medium mist, it looked a little grainy, then as it dried, shrunk and crackled! My tough glossy outer protective coat was a reptiley mess!
"Orange Peel" is appearently the term for the problem I was having. Could it be I made a mistake choosing the types of paint? Was it too humid? Too hot? Cold?
Frantically researching (and trying really hard not to panic about my f-d bike) I came to the this conclusion for my malefaction:
Lacquers are easy to use because the dry almost immediately.The first layers are not very protective, but a base coat of color to be sealed in with a clear outer coat. You can apply as many layers as you wish, the more layers (to a point) the more protection. The re-coating period is the issue here.
Lacquers have a Re-coat period as follows:
-Apply first layer, let try (5-10min)
-RE-COAT within 2 hours to maintain consistent layering.
-After the 2 Hour period passes, you must wait 36-72 HOURS to let those layers cure and apply the next layers! If you apply lacquer between this window, It will eat away at the old, not yet cured layers, and 'shrink'
it into an orange peel looking mess!
How to fix the problem?
At this point, all you can do is sand of the bad lacquer, and reapply it. Make sure you let it dry before sanding, and wait to reapply the color after the paint that may be left on cures completely, or your gonna have more sanding to do.
This is is where I left off, so this is where I will leave you until the next chapter; (hopefully) the final (fixed) finished paint job...
TBC...
Craft Bikery - Minneapolis Minnesota Twin Cities Hand Made Custom Chromoly Steel Bicycle Frames - Specializing in Commuter, Tour, Urban, Adventure, Winter, and Cargo/Work Rides
Thursday, October 13, 2011
Saturday, October 8, 2011
Painting the Maiden Ship Pt. 3 - Decals
Decals:
After doing a little research on decals, I settled for a local shop - Budget Sign and Printing in St. Paul. The set me up with a vinyl that they said they've used in the past for bike decals, a white background digital printed deal.
I went in with the order and had 3 sheets printed for within 15 min. for only $25. I also looked at other options for the future, die cut vinyl, etc. but settled on this option and cutting them myself for now.
CUTTING
the decals was easy enough, i just set up with an exacto knife and cut around the bleed outline i left on the image so it would blend w/o a white outline.
I cut each into a smaller rectangle to make the precision cutting easier, then followed the outlines, only cutting through the vinyl and leaving the backing.
After that was finished, I put a thin piece of masking tape over the lettering to hold them all in place.
Next, peeling the backing away, I carefully set one side in place and ran my fingers down the sticker until it was evenly applied, then peeled away the excess and the masking tape, leaving a beautifully placed, even, and airtight decal sticker. So far its looking great.
Final Clear Coating TBC...
Saturday, October 1, 2011
Painting the Maiden Ship Pt. 2
After the primer was allowed to cure overnight, I started with the first coat of color - black lacquer. Layering is very important when using any spray paint, but especially lacquer.
The best way to get started is with a light misting, making sure you keep moving and hit every area, then repeat until the primer is completely coated. Lacquer dries quickly, so you can keep moving around and by the time you hit each surface of the frame, the area you started should be dry enough to re-coat. Lacquer can be sanded down after it completely dries, so if you really screw up, just stop and go back to it later after a light sanding.
After a first coat, I let it dry overnight.
Next, I'll work on getting decals printed.
TBC...
Half Primer & Half First Coat |
Subscribe to:
Posts (Atom)