Showing posts with label bike frame bicycle painting black ship crafts. Show all posts

Friday, September 18, 2015

Building the Black Ship Monster X Cross with Campy Athena EPS

Oh bother. This post was started months ago and got erased in the cyber-nethers. Let's crack a beer and see what happens:

Unassuming pile of Chromoly tubing
Monster X Cross
 (Or how to turn an unassuming pile of chromoly tubing into a sweet ride)

Design and Drafting: David and I collaborated on the design for this one. As an avid rider and owner of many custom bikes, he could tell me exactly what he wanted out of  the frame. in this case, fast, aggressive but still comfy position in drop bars with Campy Athena EPS.

After drafting the soon to be frame, the appropriate tube set is ordered. in this case, Nova Cycles made a custom Monster Cross kit for Black Ship Cycles that used lighter 29er tubing with the same rear triangle as the Icebreaker.

Part 1 - Cutting, Fitting, Welding: Once the tubing showed up, the cutting and filing began. Rough cutting main tubes began with a chop saw, then mitered with bi-metal hole saws in the vertical mill. Once the tubes were notched, I perfected the fitting by hand filing and cleaning the joint. This was also a good time to drill out the enlarged bottom bracket holes to accommodate the electronic shifting wiring.
We marked all of our spots for the EPS wiring and drilled them out, then cleaned'em up with a hand file. This took a while, as neither one of us was very familiar with the group, but we found all the info we needed and it was a rewarding accomplishment to put a sweet custom spin on this bike.

As soon as everything fit up properly and snug in the fixture, the front triangle is tack welded into place in sequence.

The piece then comes out of the fixture and onto the table for the finish welding, also done in sequence to prevent heat warpage and misalignment.

Once the front triangle is check on the alignment table, the rear triangle gets cut and fit, same as the front. The tubes are slotted for dropouts using a rotary cutting wheel and hand file, then the dropouts are inserted and aligned. Everything is tacked in the frame then welded in sequence on the table. The frame is then checked for alignment and clearance.

The next step is to cut, fit, and weld in the fender mounts. After that, the brazing will begin.


Part 2 - Brazing, Finishing: First, all of the brazed on small parts get dry fit and marked on the frame with sharpie. Holes are drilled for threaded mounts and other mounts are filed to match the curve of the tube. Once they are all set up and clean, each piece is clamped, fluxed, and brazed into place with either silver or bronze using an oxy/acetylene torch. The flux is cleaned of and all braze-ons are thoroughly checked, any adjustements are made.

Finally, the seat tube is notched and reamed, any inconsistencies are filed down, then the final alignment and quality check is done. Once everything passes inspection, it's off to the paint shop! 


The Monster X Cross!


Friday, January 16, 2015

ICEBREAKER with 26" x 2.25 tires

I finally got this build put together!

I'll post a demo of the dog leash loop asap.
Morgan (our aussie-collie) loves riding through the snow! The bottom bracket is high enough that I can still pedal with him through 3-4" of soft white fluff, and plow right through snow banks.


Right now it is a frankenstein of parts from my shop and the salvage yard at the HUB Bike Coop.
1x9, SRAM X5 Der, GXP BB, Tektro Lyra discs w/V-Brake levers, 26" Bontrager Disc Wheels, 2.25" Bontrager Jones XC Tires.

So fast, so sweet...

Friday, November 14, 2014

David's 29er+ #2: How to Build a Full Custom Oversized Plus Frameset in Four Days

How to Build a Bike in 4 Days:
This was the second, and final, attempt at nailing down a the perfect frame with David's custom geometry and 3.0 Knards. It was a big (sic) challenge, but given the outcome of the last frame (BB too high and TT too short) and I had my reservations on the final product. Alas, I actually had the privileged to ride it yesterday, and it feels perfect. David commented that it rode so smooth on the road that it felt like a road bike. That was the idea! I'm stoked.

Since the first frame was off (it will actually fit me perfect 26" winter tires, more later...) I had to push to get this into the painter s soon as possible. With the last of the parts coming in on Thursday and the painter scheduled for Monday, that meant 4 days to put the whole thing together, start to finish.

Day 1: Pulled out the drawing sheet and rough cut all the tubes. Laid out the master drawing and
mitered the main triangle, with the help of the new tube notching clamp I picked up on sale. I also mitered out the chain stays and fork blades, mostly by hand, with a little help from the mill. Once everything fit together properly, I tacked it in the jig and welded most of the front triangle and fork.

Day 2: Worked on the rear Triangle, cutting, mitering, tacking, checking, and welding it all together. Given the complex geometry from the oversized tires and spacing, this took lots of measuring three times and mocking up tire clearances and spacing. But, It turned out great!


Day 3: Finished welding the fork joints,
and disc tab. Mitered bridges,
created the custom dog leash loop,
welded them in, then marked and cut all of the braze-ons.

Day 4: Brazed in all of the accessories; front and rear rack, fender, bottle and cable mounts, cleaned up the joints, and checked final alignment. All within tolerance. Tapped in the serial number. DONE!

Monday, May 21, 2012

Adjusting a 27" frame for 700c wheels


Will wanted his touring bike to fit 700c wheels. 

Here's how we made it happen:

There were other options; different brake combinations, etc. But, Will had made up his mind; we would move the mounts to fit a 700c.

First I got the bike and cleaned off most of the paint around the cantilever bosses with a flap disc, and sanded out the rest.

Then I used the torch to heat up the old filler metal (aka de-braze) and pulled the old canti's off with pliers.

Next, we filed/mitered down the new bosses to better fit his frame and forks.

Shimano recommends spacing your mounts at 65-75mm, center to center. His old mounts were more like 45mm, hard to even get a big tire through. Since the mounts we had were cut for wider frames, and we were already better off than when we started, we went with a 60mm gap and saved some time and work.

I first set up a wooden jig, that i used to tack weld on Roody's bike before brazing. Since I don't have a welder in the shop yet, that didn't wotk (re: burning wood jig) so in a brainstorm I asked around at work the next day and Tom suggested using a rack mount to hold them in place.

Brilliant! Also, adjustable. I had to file out the slide to fit the M6 bolts that are required for mounting your brakes, but after a little elbow grease it all came together beautifully!.

The first couple of times I mounted them I used the filler metal that came with the mini shop Oxy-Mapp brazing kit I had just gotten. That stuff just peeled right off (I should have known better) so after asking around, I discovered Jesse found 54% silver filler wire at the Welna's Hardware store!

After re-cleaning and re-brazing with proper filler, They stuck like they should. Permanent-style.

And Will rode off into the sunset on the way to St. Louis, forever. Bye Will, hope you had a great trip!

Tuesday, November 15, 2011

Painting the Maiden Ship Pt. 5 - Finished It!

The MAIDEN VOYAGE is ready!

   Well, for now that is.

   I'm not super-stoked on the paint job, and not sure of how long it will hold up, but, I'll find out, and keep posting. I'm sure once I have more experience, I'll go back and repaint it better. But for now, It's perfect.

   I took it into the Creative Ironworks metal shop in SE Minneapolis, a big shop that is facilitated by Chris Dunn. It is a huge well ventilated room with paint hooks hanging from the rafters.

   First, I set out my my test tube, lightly buffed half of it, and applied the final coat of paint to see how it would set. It set perfectly, smooth and glossy. So,time to move on...
   

   After lightly buffing most of the bike with a fine sandpaper, the final coat was reapplied. Most of it came out okay, but there were still some spots that still looked like reptile skin. I buffed them a little more after they dried a little and repplied, but it didn't change the fact that it just orange peeled again as soon as I reapplied the paint.

   I really have no idea why it kept doing shrinking, but I pushed through it anyways.

   At some point I decided that it was more important to finish the paint job, perfect or not, so I could assemble and ride it as soon as possible . I mean, I made it, I should be riding it, right? So here it is, ready to assemble, then, RIDE!

Tuesday, September 27, 2011

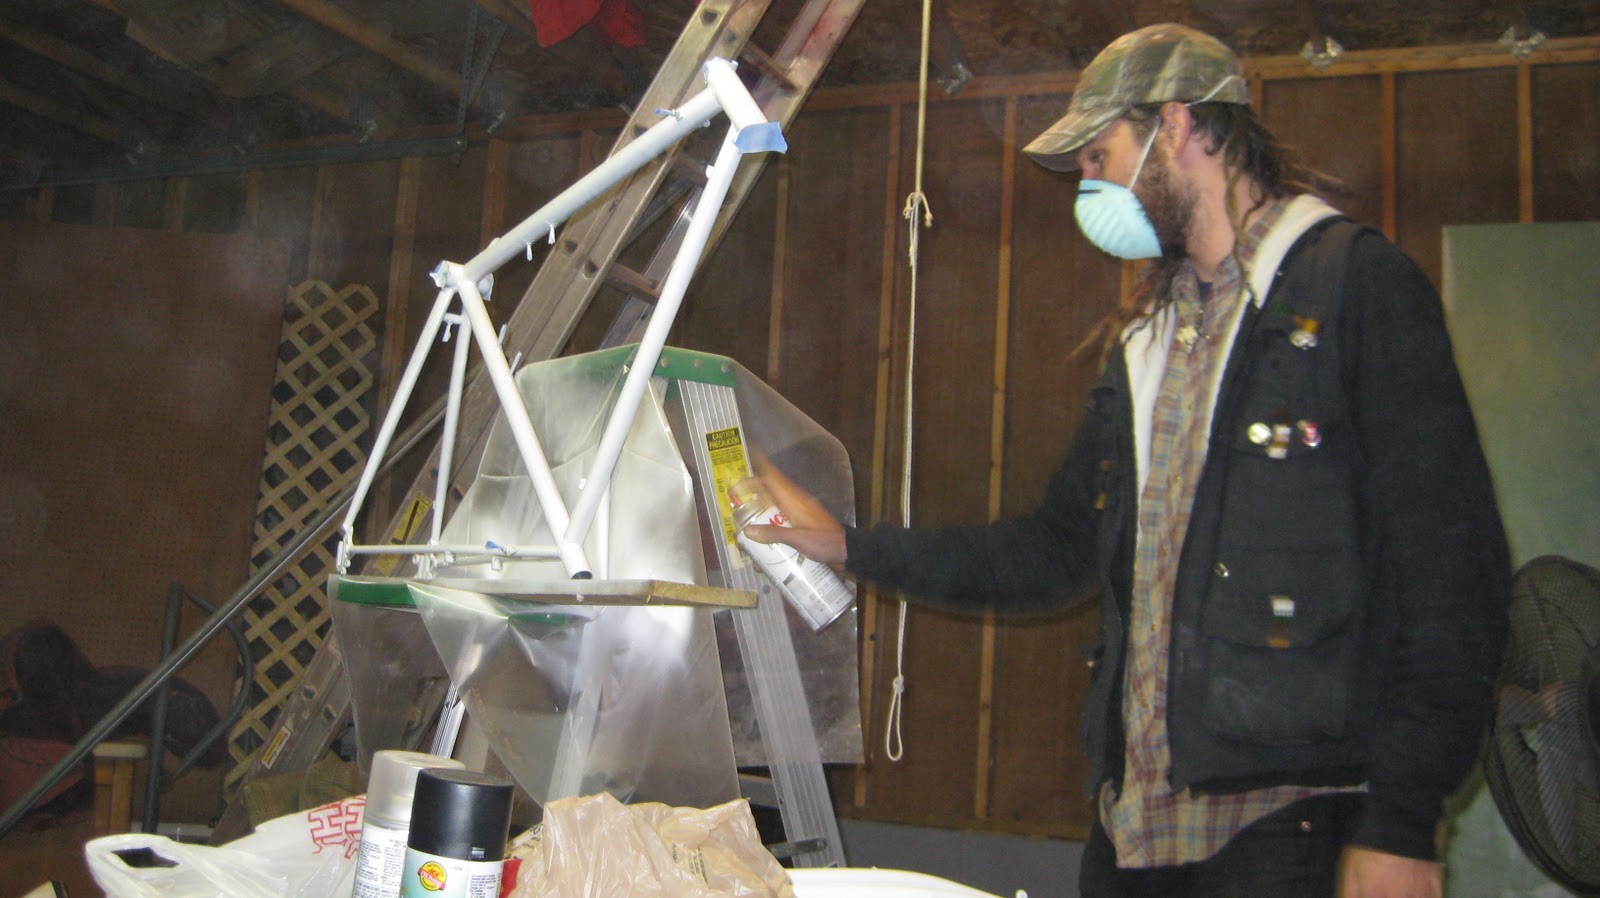
Painting the Maiden Ship Pt. 1

The Maiden cleaned and ready to paint
After doing a little research on the possibilities of the different types of spray paints one could use to coat a raw bike frame, here's what I picked:

-[White] Enamel Primer; bonds to porous metal creating a protective base coat for color and outer coats.
-[Black] Color Lacquer; Provides a thick layer of color that hardens into a solid protective layer
-Clear Coat Lacquer; Provides an outer hardened layer to protect from scratches, and protects and seals in multiple colors/decals etc.
 note: I read that lacquer primer sux and you can paint lacquer over enamel but not vise-versa, also that lacquers have been used to paint cars and motorcycles reliably for years. always clear coat the outer layer...

First, I took an old tube, cleaned it up and did some test patches with the paints I picked, let them dry, and did scratch tests. The coating seemed promisingly scratch resistant and durable, so I went for it.

   As instructed; starting with 150 grit sand paper or emery cloth, sand entire frame of rust and debris. Re-sand lightly with 220 grit. Clean entire frame with a lint-free rag wet with rubbing alcohol to remove any chemical and grease debris. let alcohol completely evaporate in a dry area.


The Maiden Ship all primed up
Next, tape the frame. This protects parts that you don't want painted; inside of seat-tube, head-tube, BB, braze-ons, etc. I rolled up little cones made from small pieces of tape to plug the braze-ons.

Now the frame is ready for primer; I simply set the frame on a board on the shelf of a ladder so it was about chest high. that gives a good close-up view of the frame to check for spots that may need more paint.

Keep the can at about a foot away and keep moving while you spray in order to decrease the risk of getting spots that accumulate paint to fast and run. if you do, you can quickly wipe it and recoat more slowly, or sand it later. Let it dry (~10 min) and flip it and cover every visible surface.

I let the primer dry over night to ensure it would be cured and ready for the lacquer topcoats. Next, I used the Black lacquer to paint the used uni-crown fork (after cleaning and priming of course) i picked up at the HUB. It looks so good, I can't wait to get to the frame!

to be continued...